Effectively Managing Image Assets in Craft CMS
As the old saying goes, a picture is worth a thousand words — especially in a visual medium like the Web. If you’re posting content on your website, using the right images can make that content more interesting, impactful, and worth sharing. Finding images to post on your website is easy enough, thanks to Google Images, Flickr, and numerous stock photo services. However, one aspect that you might not give as much thought to is the system used behind the scenes to manage those images.
Last year, I converted Opus from ExpressionEngine to Craft, and one aspect of Craft that really impressed me was its flexible approach to managing data. This is done through the use of custom fields and field layouts. Craft supports numerous field types, such as a rich text editor, for WYSIWYG text editing; assets, for handling images and other non-text content; categories and tags, for assigning meta information; and checkboxes and radio buttons. But how flexible is Craft’s approach? These myriad fields can be assigned to many different kinds of information on your site, including entries, users, and — of particular relevance for this article — assets like images.
Note: The examples and terminology I’ll be using from now on are pretty Craft-specific but the general principles are likely applicable to other content management systems. Also, this article assumes some familiarity with Craft’s core concepts and the Twig templating language.
When thinking about the fields and types of data you want to manage for your assets, it helps to first draw a distinction between asset-specific information and instance-specific information. Admittedly, those are rather awkward terms but here’s a good way to think about them:
- Asset-specific information is information that is general, default information about the asset. By default, Craft has two asset-specific fields: “Filename” and “Title,” which makes sense, as that information is intrinsic to the asset.
- Instance-specific information is information that might be unique per each instance of the image on your website.
Still not clear? Imagine this likely scenario: You upload a new image (“foo.jpg”) into the “Assets” section of your Craft admin area. You then use that image on two different entries. The asset-specific information (e.g., the filename, “foo.jpg”) remains the same on both entries because it’s the same asset, but there may be instance-specific information, like a caption, that is unique to each instance of the asset in your entries.
Asset-Specific Information
We’ll start by creating a new field group called “Assets” for all of our asset-specific fields. As noted before, Craft already specifies “Filename” and “Title” so we don’t need to worry about them. So which custom fields should be added? Here are the asset-specific fields that I have for Opus:
- “Caption” — A “plain text” field for storing a default caption.
- “Creator” — A “plain text” field for storing the name of the person who created the image, or the website where I found the image.
- “Creator URL” — A “link” field for the URL associated with the creator’s website. (I’m using Sprout’s Link Field plugin for this.)
- “License” — This is a “tags” field used to assign licenses to the image. Many free images actually use Creative Commons licenses, and it’s good form to display that information on your website when you use a CC-licensed image.
- “License URL” — A “link” field used in conjunction with the “License” tag field to store URLs associated with the CC licenses.
The first three fields are pretty straightforward, but the “License” and “License URL” fields need some explanation. Initially, the “License” field was just another “plain text” field. But as I started adding more images to Opus, I noticed that I was entering the same licenses (e.g., “CC BY 2.0,” “CC BY-ND 2.0″) over and over. That became tedious, so I tried to think of way to apply DRY principles to this aspect of content management.
Then I realized that tags were the perfect solution. Tags let you assign the same labels to different pieces of content from a single repository. I created a new tag group titled “Asset Licenses” and then, under the group’s “Field Layout” tab, added the aforementioned “License URL” field. So now, when I upload an asset, I can tag the asset with a previously added license tag, or I can create a new one. And by double-clicking on the tag in the asset modal, I can edit its name and URL.
Here’s an example of what it looks like in the Craft admin area:
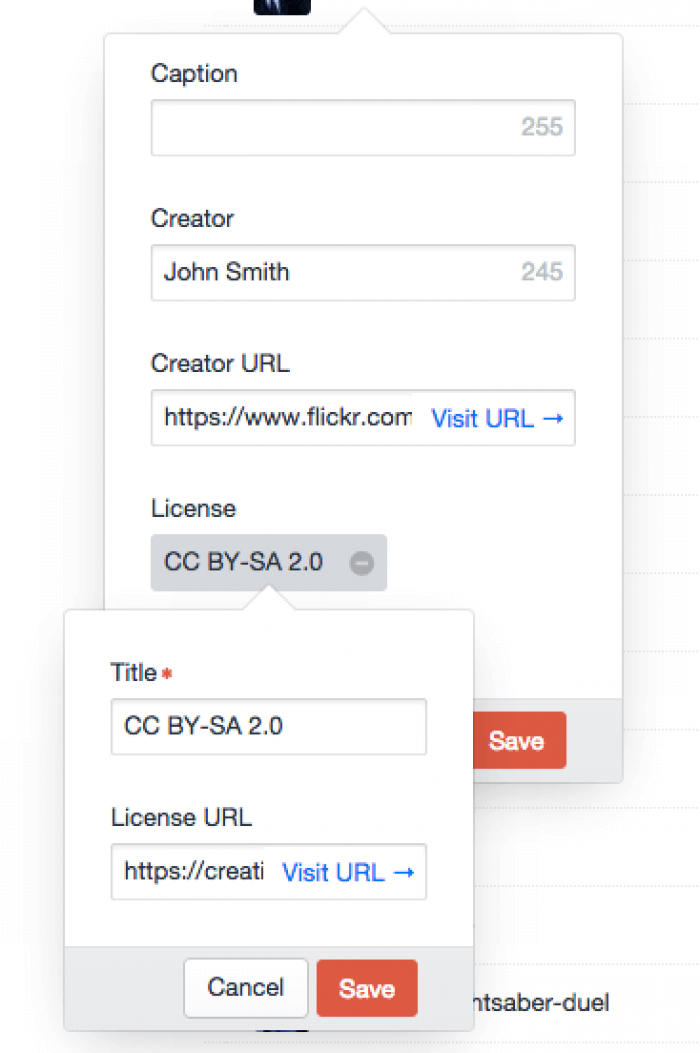
You can see the “Caption,” “Creator,” and “Creator URL” fields as well as what happens when I pick a license tag via the “License” field and double-click on it.
Instance-Specific Information
Having assets does you no good unless you actually use them in your content, which is where an asset’s instance-specific information comes in. Remember, in Craft, you can use the same asset multiple times, but you might want to have different information associated with each instance of that asset. I’ll use another example from my current Opus set-up to illustrate what you can do for instance-specific information.
Each entry that I write can have a “Featured Image” that appears at the top of the entry. (This is also used as the default post image when the entry is shared on Facebook, Twitter, et al.) In my case, the “Featured Image” field is actually a “Matrix” field type with a single block type, also called “Featured Image,” that contains the following sub-fields:
- “Image” — An “assets” field that lets me select an image from one of the site’s asset sources.
- “Alignment” — A “position select” field that lets me pick one of several alignment options for the image. This controls how the image is displayed on the front-end.
- “Caption” — A “plain text” field that lets me specify a caption unique to this instance. This will override the asset-specific caption, if one’s been specified.
- “Link” — A “link” field that lets me make the image a link to some other URL.
So when I add/edit an entry, this is what I see:
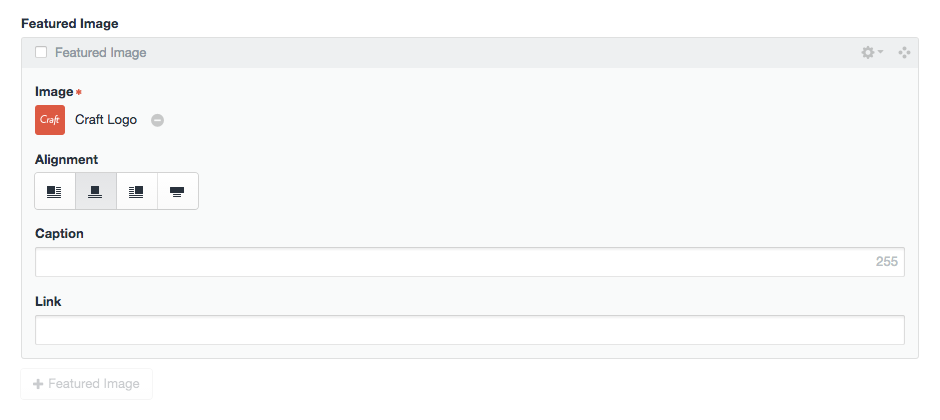
As you might have guessed, this is the “Featured Image” field for this particular entry. You’ll see that I’ve uploaded the “Craft Logo” image and set its alignment, while leaving the “Caption” and “Link” fields empty. Finally, since the “Featured Image” field is set to contain a max of one block, the button to add another “Featured Image” block is disabled.
The Template Code
That’s what everything looks like in the admin area. Now we need to translate that to the templates. However, before I get to the code, a disclaimer and request: Opus is my first Craft website and as such, I’m still learning Twig. If you’re a Craft guru, please be gentle with my code, and if you have any ideas for improvement, I’m certainly all ears.
Below, I’ve included the simplified snippet of Twig code I use for the aforementioned “Featured Image” field.
<!-- BEGIN featured image -->
<div class="entry-media entry-media--image {{ block.alignment }}">
{% set image = block.image.first() %}
{% if block.imageLink %}
<a href="{{ block.imageLink }}">
{% endif %}
<img src="{{ image.url }}" width="{{ image.width }}" height="{{ image.height }}" title="{{ image.title }}">
{% if block.imageLink %}
</a>
{% endif %}
{% if (block.caption) or (image.caption) or (image.creator) or (image.creatorUrl) or (image.license|length > 0) %}
<div class="entry-media__caption">
{% if block.caption %}
    {{ block.caption|typogrify|replace(' ', ' ') }}
{% else %}
    {{ image.caption|typogrify|replace(' ', ' ') }}
{% endif %}
{% if (image.creator) or (image.creatorUrl) or (image.license|length > 0) %}
<div class="entry-media__meta">
{%- if (image.creator) or (image.creatorUrl) -%}
{%- if (image.creatorUrl) -%}
<a href="{{ image.creatorUrl }}">
{%- endif -%}
{%- if (image.creator) -%}
{{ image.creator|typogrify|replace(' ', ' ') }}
{%- endif -%}
{%- if (image.creatorUrl) -%}
</a>
{%- endif -%}
{%- endif -%}
{%- if image.license|length > 0 -%}
{%- for license in image.license -%}
{%- if license.licenseUrl -%}
, <a href="{{ license.licenseUrl }}">{{ license.name }}</a>
{%- else -%}
, {{ license.name }}
{%- endif -%}
{%- endfor -%}
{%- endif -%}
</div>
{% endif %}
</div>
{% endif %}
</div>
<!-- END featured image -->It might seem like there’s a lot going on here, but it’s pretty straightforward. First, I create an “entry-media” element with some extender classes. (FYI, I use a class naming scheme loosely based on BEM, hence the double hyphens and underscores.)
Most of the code is simply building the “entry-media” element based on the contents of the block’s fields. For example, the “entry-media” element’s alignment is set by the “alignment” field in my block, hence the {{ block.alignment }} reference. And if the “block.imageLink” field isn’t blank, then some {% if %} statements add the necessary HTML around the image tag.
Arguably the most convoluted section is the “entry-media__caption” element, since this contains all of the non-image content (e.g., caption, creator info, license info). I use a big {% if %} statement to check to see if any of those fields contain info, and if they do, I start building the “entry-media__caption” element. Then there’s this section:
{% if block.caption %}
{{ block.caption|typogrify|replace('&nbsp;', ' ') }}
{% else %}
{{ image.caption|typogrify|replace('&nbsp;', ' ') }}
{% endif %}Remember that I have two “Caption” fields, one that is asset-specific and one that is instance-specific. This conditional checks to see if there’s an instance-specific caption (“block.caption”); otherwise, it uses the asset-specific caption (“image.caption”) if one exists. This gives me some flexibility concerning what’s displayed.
I also use a second conditional for the “entry-media__meta” element, which contains the creator and license info. Remember that the license info is simply a tag, so I use Craft’s standard approach to displaying tag content, with another conditional that makes the license a link if a URL exists for it.
You can see how all of this fits together on entries like this one and this one.
A few other random notes:
- In the template code above, you’ll see Twig snippets like
{%-and-%}. This nifty little feature is one of the Twig methods for trimming unnecessary white-space from your output. This is particularly handy if white-space can mess up your design (e.g., you’re dealing with inline elements). - Some Twig variables have
|typogrify|replace(' ', ' ')appended to them. This is an example of Twig filters. The first one calls the Craft “Typogrify” plugin, which does nice things to your text like replacing ugly quotes with curly quotes and converting double dashes to proper em dashes. However, I’ve found that it sometimes replaces spaces with ” ” which can throw off text layouts. Hence the second filter, which simply replaces ” ” strings with spaces.
Conclusion
The above example is, at its core, pretty simple, and could be easily extended to handle non-image assets like MP3s and PDFs. For example, if you’re creating a podcast, you could have asset-specific fields for MP3 duration, iTunes category, cover art, and other podcast-specific meta information. But hopefully, it gets the wheels turning for you, and shows just how flexible and extensible Craft can be.
If you have any suggestions for how to improve this article and/or my approach and code, let me know. I’d love to hear your ideas.